Leviathan: Difference between revisions
created page |
RichouHunter (talk | contribs) Filled in details |
||
| Line 8: | Line 8: | ||
== Puzzle Elements == | == Puzzle Elements == | ||
{{Puzzle Element List}} | {{Puzzle Element List|Accumulator=true|Blue door=true|Connector=true|Driller=true|Receiver=true|RGB converter=true|Switch=true}} | ||
== Overview == | == Overview == | ||
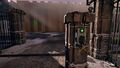
This very cinematic puzzle room is composed of two main spaces, separated by a large golden wall. | |||
Upon completing the first half of the puzzle, the player is granted access to the second room, where a wall composed of large golden blocks moving erratically back and forth protects the [[Progress Wheel]]. | |||
== Hints == | == Hints == | ||
{{TODO}} | |||
== Solution == | == Solution == | ||
{{Spoiler|2=solution| | |||
<gallery mode="slideshow"> | |||
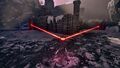
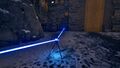
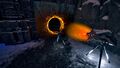
File:Abyss - 22 - 1.jpg|Take the [[Connector]] and link the red [[Emitter]] to the red [[Receiver]]. | |||
File:Abyss - 22 - 2.jpg|Bring the [[Driller]] on the other side of the [[Blue door]] and drill the bronze wall by the red [[Emitter]]. | |||
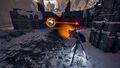
File:Abyss - 22 - 3.jpg|Take the second [[Connector]], connect it to the red [[Receiver]] on the inside of the [[Blue door]] and place it down opposite the hole. | |||
File:Abyss - 22 - 4.jpg|Walk back outside, take the first [[Connector]], link the red [[Emitter]] to the other [[Connector]] and place it down in front of the hole. | |||
File:Abyss - 22 - 5.jpg|Walk all the way around and grab the [[Connector]] through the hole. | |||
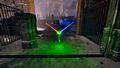
File:Abyss - 22 - 6.jpg|Use one of the [[Connector|Connectors]] to link the blue [[Emitter]] to its [[Receiver]] by the golden wall. | |||
File:Abyss - 22 - 7.jpg|Use the other [[Connector]] to link the red [[Emitter]] to the red [[Receiver]] by the golden wall. | |||
File:Abyss - 22 - 8.jpg|Use the [[Switch]] to gain access to the second room. | |||
File:Abyss - 22 - 9.jpg|Take the [[Driller]] and drill the bronze wall in the second room. | |||
File:Abyss - 22 - 10.jpg|Bring the [[RGB converter]] out of its cell. | |||
File:Abyss - 22 - 11.jpg|Place the [[Driller]] back to its original position in the first room. | |||
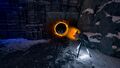
File:Abyss - 22 - 12.jpg|Connect the [[RGB converter]] to the red [[Connector]], the blue [[Emitter]] and place it down between the two rooms. | |||
File:Abyss - 22 - 13.jpg|Take the other [[Connector]] and link the green [[RGB converter]] to the green [[Receiver]] by the [[Blue door]] where the [[Accumulator]] is. | |||
File:Abyss - 22 - 14.jpg|Bring the [[Accumulator]] out of its cell and charge it green. | |||
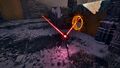
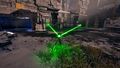
File:Abyss - 22 - 15.jpg|Take the green [[Connector]], connect it to the blue [[Emitter]] and place it down in the second room. | |||
File:Abyss - 22 - 16.jpg|Take the red [[Connector]], and link the blue [[Connector]] to the blue [[Receiver]] on the moving platform. | |||
File:Abyss - 22 - 17.jpg|Connect the [[Accumulator]] to the green [[Receiver]] in the golden wall and place it down on the platform. | |||
File:Abyss - 22 - 18.jpg|Take the [[RGB converter]] with you, walk on the platform and block the blue beam so that the platform raises. | |||
File:Abyss - 22 - 19.jpg|Connect the [[RGB converter]] to the [[Accumulator]], the first blue [[Connector]] and both red [[Receiver|Receivers]]. Place it down on the second platform. | |||
File:Abyss - 22 - 20.jpg|Disconnect the second blue [[Connector]] to prevent the first platform from descending and finish the puzzle. | |||
</gallery> | |||
}} | |||
== Miscellaneous == | |||
=== QR Code === | |||
[[File:Abyss - 22 - QR Code.jpg|thumb|The QR Code, written by [[Pandora]].]] | |||
On the cliff side on the left of the entrance, a QR Code written by Pandora can be found.<blockquote>Wisdom is knowing that loving the world is enough. | |||
-- [[Pandora]]</blockquote> | |||
[[Category:TTP2 Into the Abyss Puzzles]] | [[Category:TTP2 Into the Abyss Puzzles]] | ||
[[Category:TTP2 Into the Abyss]] | [[Category:TTP2 Into the Abyss]] | ||
[[Category:Puzzles]] | [[Category:Puzzles]] | ||
Latest revision as of 17:54, 27 January 2025
This article is about the puzzle. For the text document, see Leviathan (document).
| Leviathan | |
|---|---|

| |
| Identifier: | Abyss-22 |
| Area: | Into the Abyss |
| Previous Puzzle: | Hierarchy |
| Next Puzzle: | One-Way Link |
Leviathan is the twenty-second puzzle in Into the Abyss, part of the Road to Elysium expansion for The Talos Principle 2.
Puzzle Elements
Overview
This very cinematic puzzle room is composed of two main spaces, separated by a large golden wall.
Upon completing the first half of the puzzle, the player is granted access to the second room, where a wall composed of large golden blocks moving erratically back and forth protects the Progress Wheel.
Hints
TODO
Solution
[ solution ]
-
-

-
-
-
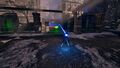
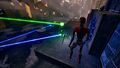
 Walk all the way around and grab the Connector through the hole.
 -
-
-
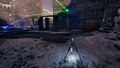
 Use the Switch to gain access to the second room.
 -
 Take the Driller and drill the bronze wall in the second room.
 -
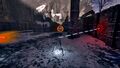
 Bring the RGB converter out of its cell.
 -
 Place the Driller back to its original position in the first room.
 -
 Connect the RGB converter to the red Connector, the blue Emitter and place it down between the two rooms.
 -
 Take the other Connector and link the green RGB converter to the green Receiver by the Blue door where the Accumulator is.
 -
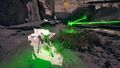 Bring the Accumulator out of its cell and charge it green.
 -
-
-
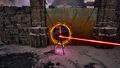
 Connect the Accumulator to the green Receiver in the golden wall and place it down on the platform.
 -
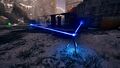
 Take the RGB converter with you, walk on the platform and block the blue beam so that the platform raises.
 -
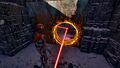
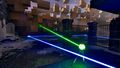
 Connect the RGB converter to the Accumulator, the first blue Connector and both red Receivers. Place it down on the second platform.
 -
 Disconnect the second blue Connector to prevent the first platform from descending and finish the puzzle.


Miscellaneous
QR Code

On the cliff side on the left of the entrance, a QR Code written by Pandora can be found.
Wisdom is knowing that loving the world is enough. -- Pandora