The High Road: Difference between revisions
Appearance
RichouHunter (talk | contribs) Added overview image |
RichouHunter (talk | contribs) →Solution: Added solution |
||
| Line 9: | Line 9: | ||
== Puzzle Elements == | == Puzzle Elements == | ||
{{Puzzle Element List}} | {{Puzzle Element List|Blue door=true|Connector=true|Gravshifter=true|Hexahedron=true|Inverter=true|Pressure plate=true|Receiver=true|Swapper=true}} | ||
== Overview == | == Overview == | ||
| Line 16: | Line 16: | ||
== Solution == | == Solution == | ||
{{Spoiler|2=solution| | |||
<gallery mode="slideshow"> | |||
File:Bleesed Blue 8 - 1.jpg|Place the [[Gravshifter]] onto the [[Pressure plate]]. | |||
File:Bleesed Blue 8 - 2.jpg|Place the [[Hexahedron]] onto the other [[Pressure plate]]. | |||
File:Bleesed Blue 8 - 3.jpg|[[Swapper|Swap]] the [[Gravshifter]] for the [[Connector]]. | |||
File:Bleesed Blue 8 - 4.jpg|Use the [[Connector]] to link the blue [[Emitter]] to the [[Receiver]]. Swap the Connector for the [[Hexahedron]] on the [[Pressure plate]]. | |||
File:Bleesed Blue 8 - 5.jpg|Place the [[Hexahedron]] on the [[Gravity Surface]] on the ground. | |||
File:Bleesed Blue 8 - 6.jpg|Walk back inside the cell, and [[Swapper|swap]] the [[Connector]] for the [[Gravshifter]]. | |||
File:Bleesed Blue 8 - 7.jpg|Use the [[Gravshifter]] to pull the [[Hexahedron]] up to the ceiling. | |||
File:Bleesed Blue 8 - 8.jpg|Use the [[Gravshifter]] to pull the [[Hexahedron]] towards the opposite side of the room and place it down on the [[Pressure plate]]. | |||
File:Bleesed Blue 8 - 9.jpg|Bring the second [[Gravshifter]] into the main area and use it on the [[Gravity Surface]] located above the entrance. | |||
File:Bleesed Blue 8 - 10.jpg|Walk back inside the cell and use the first [[Gravshifter]] to pull the [[Hexahedron]] into the second Gravshifter's beam. | |||
File:Bleesed Blue 8 - 11.jpg|Use the first [[Gravshifter]] again, this time on the [[Gravity Surface]] above the cell. Place the Gravshifter down on the Pressure plate on the ground. | |||
File:Bleesed Blue 8 - 12.jpg|Use the second [[Gravshifter]] to pull the [[Hexahedron]] into the other Gravshifter's beam and onto the [[Pressure plate]] on the ceiling. | |||
File:Bleesed Blue 8 - 13.jpg|[[Swapper|Swap]] on the [[Gravshifter|Gravshifters]] for the [[Inverter]]. | |||
File:Bleesed Blue 8 - 14.jpg|[[Swapper|Swap]] the other [[Gravshifter]] for the [[Connector]]. | |||
File:Bleesed Blue 8 - 15.jpg|Use the [[Connector]] to link the blue [[Emitter]] to the blue [[Receiver]]. | |||
File:Bleesed Blue 8 - 16.jpg|Connect the [[Inverter]] to the blue [[Emitter]] as well as the red [[Receiver]] on the ceiling and put it down on the [[Gravity Surface]]. | |||
File:Bleesed Blue 8 - 17.jpg|[[Swapper|Swap]] the [[Connector]] for the [[Gravshifter]]. | |||
File:Bleesed Blue 8 - 18.jpg|Use the [[Gravshifter]] on the [[Gravity Surface]] above the [[Inverter]] to pull it up and allow it to connect and open the [[Blue door]] on the ceiling. | |||
File:Bleesed Blue 8 - 19.jpg|Use the [[Gravshifter]] on the [[Gravity Surface]] opposite to the [[Hexahedron]] to pull it onto the final [[Pressure plate]] and finish the puzzle. Phew! | |||
</gallery> | |||
}} | |||
[[Category:TTP2 Isle of the Blessed Puzzles]] | [[Category:TTP2 Isle of the Blessed Puzzles]] | ||
[[Category:TTP2 Isle of the Blessed]] | [[Category:TTP2 Isle of the Blessed]] | ||
[[Category:Puzzles]] | [[Category:Puzzles]] | ||
Latest revision as of 16:40, 20 December 2024
| The High Road | |
|---|---|

| |
| Identifier: | Blue-8 |
| Area: | Isle of the Blessed |
| Puzzle Type: | Main |
| Previous Puzzle: | The Twist and the Turn |
| Next Puzzle: | The Helping Hand |
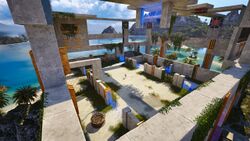
The High Road is the eighth puzzle in the blue section of the Isle of the Blessed.
Puzzle Elements
Overview
Hints
Solution
[ solution ]


