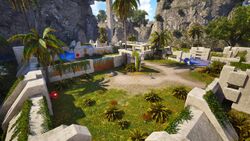
The Phantom Tunnel: Difference between revisions
Appearance
Created page with "{{Infobox TTP2 Puzzle |identifier=Red-Δ |area=Isle of the Blessed |puzzletype=Lost |previous=The Riddle of the Citadel }} '''The Phantom Tunnel''' is the lost puzzle in the red section of the Isle of the Blessed. == Puzzle Elements == {{Puzzle Element List}} == Overview == == Hints == == Solution == Category:TTP2 Isle of the Blessed Puzzles Category:TTP2 Isle of the Blessed Category:Puzzles" |
RichouHunter (talk | contribs) →Solution: Added solution |
||
| Line 4: | Line 4: | ||
|puzzletype=[[:Category:TTP2 Isle of the Blessed Puzzles|Lost]] | |puzzletype=[[:Category:TTP2 Isle of the Blessed Puzzles|Lost]] | ||
|previous=[[The Riddle of the Citadel]] | |previous=[[The Riddle of the Citadel]] | ||
}} | |image=The Phantom Tunnel.jpg}} | ||
'''The Phantom Tunnel''' is the lost puzzle in the red section of the [[Isle of the Blessed]]. | '''The Phantom Tunnel''' is the lost puzzle in the red section of the [[Isle of the Blessed]]. | ||
== Puzzle Elements == | == Puzzle Elements == | ||
{{Puzzle Element List}} | {{Puzzle Element List|Blue door=true|Connector=true|Driller=true|Pressure plate=true|Purple barrier=true|Receiver=true}} | ||
== Overview == | == Overview == | ||
| Line 15: | Line 15: | ||
== Solution == | == Solution == | ||
{{Spoiler|2=solution| | |||
<gallery mode="slideshow"> | |||
File:Blessed Red - Lost - 1.jpg|[[Driller|Drill]] the bronze wall next to the [[Purple barrier]]. | |||
File:Blessed Red - Lost - 2.jpg|Walk around and put the [[Connector]] through the hole. | |||
File:Blessed Red - Lost - 3.jpg|Open the [[Blue door]] by [[Connector|connecting]] the red [[Emitter]] to the red [[Receiver]] through the [[Purple barrier]]. | |||
File:Blessed Red - Lost - 4.jpg|[[Driller|Drill]] the far bronze wall through the window, where the second [[Connector]] is. | |||
File:Blessed Red - Lost - 5.jpg|Grab the second [[Connector]] through the hole, connect it to the blue [[Emitter]] and place it back in its original position. | |||
File:Blessed Red - Lost - 6.jpg|Take the first [[Connector]], and link the blue [[Connector]] to the blue [[Receiver]]. | |||
File:Blessed Red - Lost - 7.jpg|Use the second [[Driller]] to drill the bronze wall nearby and place it down on the [[Pressure plate]]. | |||
File:Blessed Red - Lost - 8.jpg|Take the first [[Connector]], link the red [[Emitter]] to the red [[Receiver]] again, but this time, place in down inside the cell, in line with the [[Driller]] hole. | |||
File:Blessed Red - Lost - 9.jpg|Walk all the way around, take the second [[Connector]] and link the red Connector to the [[Receiver]] by the [[Progress Wheel]], through both holes. | |||
</gallery> | |||
}} | |||
[[Category:TTP2 Isle of the Blessed Puzzles]] | [[Category:TTP2 Isle of the Blessed Puzzles]] | ||
[[Category:TTP2 Isle of the Blessed]] | [[Category:TTP2 Isle of the Blessed]] | ||
[[Category:Puzzles]] | [[Category:Puzzles]] | ||
Latest revision as of 06:40, 18 December 2024
| The Phantom Tunnel | |
|---|---|

| |
| Identifier: | Red-Δ |
| Area: | Isle of the Blessed |
| Puzzle Type: | Lost |
| Previous Puzzle: | The Riddle of the Citadel |
| Next Puzzle: | None |
The Phantom Tunnel is the lost puzzle in the red section of the Isle of the Blessed.
Puzzle Elements
Overview
Hints
Solution
[ solution ]


