Circular Oasis: Difference between revisions
m Text replacement - "== Tetromino Bridge ==" to "== Tetromino bridge ==" |
m Text replacement - " Monument(s|) ==" to " monument$1 ==" |
||
| Line 37: | Line 37: | ||
|solution}} | |solution}} | ||
== Star | == Star monuments == | ||
=== Pandora | === Pandora monument === | ||
'''Solution''' | '''Solution''' | ||
<div class="mw-collapsible mw-collapsed">{{TODO}}</div> | <div class="mw-collapsible mw-collapsed">{{TODO}}</div> | ||
| Line 45: | Line 45: | ||
''{{TODO}}'' | ''{{TODO}}'' | ||
=== Sphinx | === Sphinx monument === | ||
'''Solution''' | '''Solution''' | ||
<div class="mw-collapsible mw-collapsed">{{TODO}}</div> | <div class="mw-collapsible mw-collapsed">{{TODO}}</div> | ||
Revision as of 10:06, 9 December 2023
| Circular Oasis | |
|---|---|
| Short name: | South 3 |
| Area Type: | Regular |
| Previous Story Area: | Verdant Canyon |
| Next Story Area: | Megastructure Interior - South |
The Circular Oasis, also commonly known as South 3, is an artificial oasis in the otherwise lifeless desert that stretches across the south-western portion of the island.


Puzzles
Main Puzzles
Lost Puzzles
Gold Puzzle
Lost Lab
The lost laboratory is located TODO
Tetromino bridge
[ solution ]
-
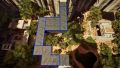 First section of the bridge.
 -
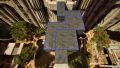 Second section of the bridge.


Star monuments
Pandora monument
Solution
TODO
Quote
TODO
Sphinx monument
Solution
TODO
Quote
TODO
Prometheus Sparks
The first Prometheus Spark can be found TODO
The second Prometheus Spark can be found TODO