The Final Obstruction: Difference between revisions
Appearance
Created page with "{{Infobox TTP2 Puzzle |identifier=Red-Gold |area=Isle of the Blessed |puzzletype=Gold }} '''The Final Obstruction''' is the gold puzzle in the red section of the Isle of the Blessed. == Puzzle Elements == {{Puzzle Element List}} == Overview == == Hints == == Solution == Category:TTP2 Isle of the Blessed Puzzles Category:TTP2 Isle of the Blessed Category:Puzzles" |
RichouHunter (talk | contribs) Added solution |
||
| Line 3: | Line 3: | ||
|area=[[Isle of the Blessed]] | |area=[[Isle of the Blessed]] | ||
|puzzletype=[[:Category:TTP2 Isle of the Blessed Puzzles|Gold]] | |puzzletype=[[:Category:TTP2 Isle of the Blessed Puzzles|Gold]] | ||
}} | |image=The Final Obstruction.jpg}} | ||
[[The Final Obstruction]] is the gold puzzle in the red section of the [[Isle of the Blessed]]. | |||
== Puzzle Elements == | == Puzzle Elements == | ||
{{Puzzle Element List}} | {{Puzzle Element List|Blue door=true|Clone=true|Connector=true|Jammer=true|Pressure plate=true|Receiver=true}} | ||
== Overview == | == Overview == | ||
The puzzle room is composed of three "lanes", each with a [[Clone]] and a set of two [[Blue door|Blue doors]] controlled by various [[Receiver|Receivers]] and [[Pressure plate|Pressure plates]]. | |||
== Hints == | == Hints == | ||
== Solution == | == Solution == | ||
{{Spoiler|2=solution| | |||
<gallery mode="slideshow"> | |||
File:Blessed Red - Gold - 1.jpg|Take control of the [[Clone]] in the right lane. | |||
File:Blessed Red - Gold - 2.jpg|Connect the [[Connector]] to the red [[Emitter]] and place it down on the [[Pressure plate]]. | |||
File:Blessed Red - Gold - 3.jpg|Position the [[Clone]] on the second [[Pressure plate]] and take control of [[Yaqut]]. | |||
File:Blessed Red - Gold - 4.jpg|Link the red [[Connector]] to the red [[Receiver]] in the middle lane. | |||
File:Blessed Red - Gold - 5.jpg|Take control of the [[Clone]] in the left lane. | |||
File:Blessed Red - Gold - 6.jpg|Use the [[Connector]] to link the red [[Connector]] in the middle lane to the red [[Receiver]]. | |||
File:Blessed Red - Gold - 7.jpg|Take the second [[Connector]], link it to the blue [[Emitter]] and place it down in front of the window. | |||
File:Blessed Red - Gold - 8.jpg|Place the [[Clone]] on the [[Pressure plate]] and take control of [[Yaqut]] through the grate. | |||
File:Blessed Red - Gold - 9.jpg|Use the [[Connector]] to link the blue [[Connector]] in the left lane to the blue [[Receiver]] in the right lane. | |||
File:Blessed Red - Gold - 10.jpg|Take control of the [[Clone]] in the right lane. Use the [[Connector]] to link the red [[Emitter]] to the red [[Receiver]] in the middle lane. | |||
File:Blessed Red - Gold - 11.jpg|Take the [[Jammer]] and open the second [[Blue door]] in the middle lane. Take control of the original [[Yaqut]] and finish the puzzle. | |||
</gallery> | |||
}} | |||
[[Category:TTP2 Isle of the Blessed Puzzles]] | [[Category:TTP2 Isle of the Blessed Puzzles]] | ||
[[Category:TTP2 Isle of the Blessed]] | [[Category:TTP2 Isle of the Blessed]] | ||
[[Category:Puzzles]] | [[Category:Puzzles]] | ||
Latest revision as of 11:14, 23 December 2024
| The Final Obstruction | |
|---|---|

| |
| Identifier: | Red-Gold |
| Area: | Isle of the Blessed |
| Puzzle Type: | Gold |
| Previous Puzzle: | None |
| Next Puzzle: | None |
The Final Obstruction is the gold puzzle in the red section of the Isle of the Blessed.
Puzzle Elements
Overview
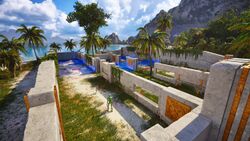
The puzzle room is composed of three "lanes", each with a Clone and a set of two Blue doors controlled by various Receivers and Pressure plates.
Hints
Solution
[ solution ]


