The Ballet of the Bots: Difference between revisions
Appearance
Created page with "{{Infobox TTP2 Puzzle |identifier=Blue-2 |area=Isle of the Blessed |puzzletype=Main |previous=The Smoothie Solution |next=The Closing Conundrum }} '''The Ballet of the Bots''' is the second puzzle in the blue section of the Isle of the Blessed. == Puzzle Elements == {{Puzzle Element List}} == Overview == == Hints == == Solution == Category:TTP2 Isle of the Blessed Puzzles Category:TTP2 Isle of the..." |
RichouHunter (talk | contribs) →Solution: Added solution |
||
| Line 5: | Line 5: | ||
|previous=[[The Smoothie Solution]] | |previous=[[The Smoothie Solution]] | ||
|next=[[The Closing Conundrum]] | |next=[[The Closing Conundrum]] | ||
}} | |image=The Ballet of the Bots.jpg}} | ||
'''The Ballet of the Bots''' is the second puzzle in the blue section of the [[Isle of the Blessed]]. | '''The Ballet of the Bots''' is the second puzzle in the blue section of the [[Isle of the Blessed]]. | ||
== Puzzle Elements == | == Puzzle Elements == | ||
{{Puzzle Element List}} | {{Puzzle Element List|Blue door=true|Clone=true|Pressure plate=true}} | ||
== Overview == | == Overview == | ||
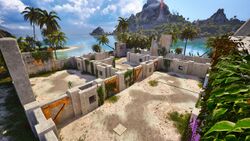
The puzzle in composed of three separate rooms with multiple windows allowing the player to navigate between multiple [[Clone|Clones]]. A [[Pressure plate]] in one of the rooms controls a [[Blue door]] behind which lies the [[Progress Wheel]]. | |||
== Hints == | == Hints == | ||
== Solution == | == Solution == | ||
{{Spoiler|2=solution| | |||
<gallery mode="slideshow"> | |||
File:Bleesed Blue - 2 - 1.jpg|Place the original [[Yaqut]] on the X mark right in front of the entrance and take control of the first [[Clone]]. | |||
File:Bleesed Blue - 2 - 2.jpg|Without moving the [[Clone]], turn 90 degrees on your left and take control of the second [[Clone]]. | |||
File:Bleesed Blue - 2 - 3.jpg|Move the second [[Clone]] left, place it on the X mark on the ground and take control of the original [[Yaqut]]. | |||
File:Bleesed Blue - 2 - 4.jpg|Bring [[Yaqut]] onto the other X mark on the ground, the one closest to the second [[Clone]] and take control back onto the second Clone. | |||
File:Bleesed Blue - 2 - 5.jpg|Place the second [[Clone]] next to the [[Pressure plate]] and take control of the original [[Yaqut]]. | |||
File:Bleesed Blue - 2 - 6.jpg|Go back to the first X mark, in front of the entrance, and take control of the first [[Clone]]. | |||
File:Bleesed Blue - 2 - 7.jpg|Walk towards the back of the room and take control of the second [[Clone]]. | |||
File:Bleesed Blue - 2 - 8.jpg|Walk on top of the [[Pressure plate]] and take control of the first [[Clone]] again. | |||
File:Bleesed Blue - 2 - 9.jpg|Take control of the original [[Yaqut]] and finish the puzzle. | |||
</gallery> | |||
}} | |||
[[Category:TTP2 Isle of the Blessed Puzzles]] | [[Category:TTP2 Isle of the Blessed Puzzles]] | ||
[[Category:TTP2 Isle of the Blessed]] | [[Category:TTP2 Isle of the Blessed]] | ||
[[Category:Puzzles]] | [[Category:Puzzles]] | ||
Latest revision as of 11:27, 18 December 2024
| The Ballet of the Bots | |
|---|---|

| |
| Identifier: | Blue-2 |
| Area: | Isle of the Blessed |
| Puzzle Type: | Main |
| Previous Puzzle: | The Smoothie Solution |
| Next Puzzle: | The Closing Conundrum |
The Ballet of the Bots is the second puzzle in the blue section of the Isle of the Blessed.
Puzzle Elements
Overview
The puzzle in composed of three separate rooms with multiple windows allowing the player to navigate between multiple Clones. A Pressure plate in one of the rooms controls a Blue door behind which lies the Progress Wheel.
Hints
Solution
[ solution ]


