Whole Lotta Jamming: Difference between revisions
Appearance
m Sigil reward shape |
Tearphones (talk | contribs) Added some hints |
||
| (One intermediate revision by the same user not shown) | |||
| Line 1: | Line 1: | ||
{{Infobox TTP1 Puzzle | |||
|image=Whole Lotta Jamming.jpg | |||
|area=[[B7]] | |area=[[B7]] | ||
|land=[[Land of Death]] | |land=[[Land of Death]] | ||
| Line 11: | Line 12: | ||
== Hints == | == Hints == | ||
{{ProgressiveHint|If you're struggling to get started|A jammer is immediately available. Your second order of business is to find a key.}} | |||
{{ProgressiveHint|If you're scared of the mines|There is space enough to squeeze by, but you have to get them out of rhythm. Look for a window}} | |||
{{ProgressiveHint|If you're wondering about the objective|You need control of 3 jammers. the objective is to collect them all so you can get the sigil.}} | |||
{{ProgressiveHint|If you're wondering what the point of the blue gates near the far end of the puzzle is|That's a shortcut to get the jammers out without having to squeeze by the mines, one jammer at a time.}} | |||
== Solution == | == Solution == | ||
Latest revision as of 08:10, 9 May 2025
| Whole Lotta Jamming | |
|---|---|

| |
| Area: | B7 |
| Land: | Land of Death |
| Reward: | |
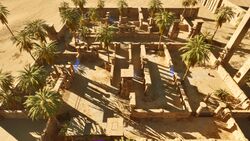
Whole Lotta Jamming is a puzzle in World B7 of The Talos Principle.
Puzzle elements
- No puzzle elements selected. Please edit this list.
Overview
Hints
If you're struggling to get started:
[ hint ]
A jammer is immediately available. Your second order of business is to find a key.
If you're scared of the mines:
[ hint ]
There is space enough to squeeze by, but you have to get them out of rhythm. Look for a window
If you're wondering about the objective:
[ hint ]
You need control of 3 jammers. the objective is to collect them all so you can get the sigil.
If you're wondering what the point of the blue gates near the far end of the puzzle is:
[ hint ]
That's a shortcut to get the jammers out without having to squeeze by the mines, one jammer at a time.
