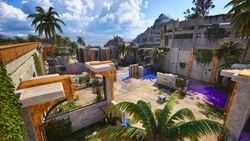
The Intruder: Difference between revisions
Appearance
No edit summary |
RichouHunter (talk | contribs) →Solution: Added solution |
||
| (One intermediate revision by the same user not shown) | |||
| Line 5: | Line 5: | ||
|previous=[[The Big Hassle]] | |previous=[[The Big Hassle]] | ||
|next=[[The Trident Enigma]] | |next=[[The Trident Enigma]] | ||
}} | |image=The Intruder.jpg}} | ||
'''The Intruder''' is the fifth puzzle in the blue section of the [[Isle of the Blessed]]. | '''The Intruder''' is the fifth puzzle in the blue section of the [[Isle of the Blessed]]. | ||
== Puzzle Elements == | == Puzzle Elements == | ||
{{Puzzle Element List|Blue door=true|Connector=true|Gravshifter=true|Hexahedron=true|Pressure plate=true|Purple barrier=true|Receiver=true}} | {{Puzzle Element List|Blue door=true|Connector=true|Fan=true|Gravshifter=true|Hexahedron=true|Pressure plate=true|Purple barrier=true|Receiver=true}} | ||
== Overview == | == Overview == | ||
| Line 18: | Line 18: | ||
== Solution == | == Solution == | ||
{{Spoiler|2=solution| | |||
<gallery mode="slideshow"> | |||
File:Blessed Blue - 5 - 1.jpg|Take the [[Connector]] and place it on the [[Pressure plate]]. | |||
File:Blessed Blue - 5 - 2.jpg|Take the [[Hexahedron]] inside of the cell, and swap it for the [[Connector]] on the [[Pressure plate]]. | |||
File:Blessed Blue - 5 - 3.jpg|Use the [[Connector]] to link the red [[Emitter]] to the red [[Receiver]], and place it down on the [[Pressure plate]]. | |||
File:Blessed Blue - 5 - 4.jpg|Take the [[Gravshifter]] out of its cell and target the [[Gravity Surface]] in the first room. | |||
File:Blessed Blue - 5 - 5.jpg|Place the [[Hexahedron]] in front of the gravity tunnel. | |||
File:Blessed Blue - 5 - 6.jpg|Walk on top of the [[Pressure plate]] to let the gravity tunnel pull the [[Hexahedron]] into the main area. | |||
File:Blessed Blue - 5 - 7.jpg|Take the [[Gravshifter]] and target the small gravity plate in the second room. | |||
File:Blessed Blue - 5 - 8.jpg|Take the [[Hexahedron]] and place it on top of the [[Fan]]. | |||
File:Blessed Blue - 5 - 9.jpg|Take the [[Connector]], climb on the [[Gravity Surface]] in the main area and jump over the wall into the other room. | |||
File:Blessed Blue - 5 - 10.jpg|Link the [[Connector]] to the blue [[Emitter]] in the first room and the blue [[Receiver]] by the [[Progress Wheel]]. Place it on top of the [[Hexahedron]]. | |||
File:Blessed Blue - 5 - 11.jpg|Walk onto the [[Pressure plate]] to send the [[Hexahedron]] and [[Connector]] in the air. | |||
File:Blessed Blue - 5 - 12.jpg|Walk off the [[Pressure plate]] to let the gravity tunnel grab the [[Hexahedron]], pulling the [[Connector]] into a position where it can open the final [[Blue door]]. | |||
</gallery> | |||
}} | |||
[[Category:TTP2 Isle of the Blessed Puzzles]] | [[Category:TTP2 Isle of the Blessed Puzzles]] | ||
[[Category:TTP2 Isle of the Blessed]] | [[Category:TTP2 Isle of the Blessed]] | ||
[[Category:Puzzles]] | [[Category:Puzzles]] | ||
Latest revision as of 12:48, 20 December 2024
| The Intruder | |
|---|---|

| |
| Identifier: | Blue-5 |
| Area: | Isle of the Blessed |
| Puzzle Type: | Main |
| Previous Puzzle: | The Big Hassle |
| Next Puzzle: | The Trident Enigma |
The Intruder is the fifth puzzle in the blue section of the Isle of the Blessed.
Puzzle Elements
Overview
Hints
Why is the large gravity plate wall so tall?:
[ hint ]
You can walk on the wall and jump over the fence from the upper section.
Solution
[ solution ]


