Metathesis: Difference between revisions
Created page with "{{Infobox TTP2 Puzzle |identifier=Abyss-10 |image = Abyss-10.jpg|area=Into the Abyss |previous=Color Theory |next=The Ring }} '''Metathesis''' is the tenth puzzle in Into the Abyss, part of the Road to Elysium expansion for The Talos Principle 2. == Puzzle Elements == {{Puzzle Element List}} == Overview == == Hints == == Solution == Category:TTP2 Into the Abyss Puzzles Category:TTP2 Into the Abyss Category:Puzzles" |
RichouHunter (talk | contribs) Added hidden QR code |
||
| (3 intermediate revisions by the same user not shown) | |||
| Line 5: | Line 5: | ||
|next=[[The Ring]] | |next=[[The Ring]] | ||
}} | }} | ||
[[Metathesis]] is the tenth puzzle in [[Into the Abyss]], part of the [[Road to Elysium]] expansion for The Talos Principle 2. | |||
== Puzzle Elements == | == Puzzle Elements == | ||
{{Puzzle Element List}} | {{Puzzle Element List|Blue door=true|Ladder=true|Pressure plate=true|Receiver=true|RGB converter=true}} | ||
== Overview == | == Overview == | ||
The puzzle is a variation of [[Metaphora]], where the [[Inverter]] in the second room has been replaced by a fourth [[RGB converter]], and where two additional cells are located on each side of the first room. | |||
== Hints == | == Hints == | ||
{{ProgressiveHint|If you have trouble getting started|The first order of business is to retrieve the two [[RGB converter]]s from the side cells. | |||
}}{{ProgressiveHint|If you have trouble with intersecting lasers|Remember that there are two [[Receiver]]s on the side of the room that can be used as extra connection targets to block out unwanted lasers. | |||
}}{{ProgressiveHint|If the [[Blue door]] keeps closing just after it opens|When the door opens, the fourth [[RGB converter]] starts emitting lasers that you don't need, cutting the ones you do need and causing the door to close. How can you prevent this from happening? Remember that an RGB converter only emits lasers when it receives '''exactly two colors''', no more, no less. | |||
}} | |||
== Solution == | == Solution == | ||
{{Spoiler|2=solution| | |||
<gallery mode="slideshow"> | |||
File:Abyss - 10 - 1.jpg|Connect the [[RGB converter]] to both [[Emitter|Emitters]], as well as the green [[Receiver]] on the side. | |||
File:Abyss - 10 - 2.jpg|Take the second [[RGB converter]], connect it to the red [[Emitter]], green [[RGB converter]] and both blue [[Receiver|Receivers]]. | |||
File:Abyss - 10 - 3.jpg|Bring the third [[RGB converter]] into the main area. | |||
File:Abyss - 10 - 4.jpg|Disconnect the green [[RGB converter]] from the side cell. | |||
File:Abyss - 10 - 5.jpg|Connect the third [[RGB converter]] to the blue [[Emitter]], green converter and red [[Receiver]]. | |||
File:Abyss - 10 - 6.jpg|Connect the fourth [[RGB converter]] to all three converters, as well as both [[Emitter|Emitters]]. This will cause the [[Blue door]] to close; walk back into the first room before it happens, or take the [[Ladder]] if you get locked in. | |||
File:Abyss - 10 - 7.jpg|Add both [[Receiver|Receivers]] on the side to the green [[RGB converter]]'s targets. These extra beams will block out the ones coming from the [[Emitter|Emitters]] to the fourth converter, allowing the door to open again. Additionally, the green beam to the fourth converter causes it to receive three colors, preventing it from emitting beams that would cause the door to close. | |||
File:Abyss - 10 - 8.jpg|Pick up the green [[RGB converter]]. This causes the fourth converter to receive red and blue from the [[Emitter|Emitters]], sending green to both side converters, maintaining the [[Blue door]] open. | |||
File:Abyss - 10 - 9.jpg|Bring the [[RGB converter]] to the first [[Pressure plate]]. | |||
File:Abyss - 10 - 10.jpg|Take the fourth [[RGB converter]] and place it on the second [[Pressure plate]], finishing the puzzle. | |||
</gallery> | |||
}} | |||
=== Alternative solutions === | |||
==== "Sleight of Hand" ==== | |||
{{Spoiler|2=alternative solution| | |||
[[File:Abyss - 10 - 6.1.jpg|left|thumb|Grabbing the green [[RGB converter]] before the [[Blue door]] closes.]] | |||
If you position the green [[RGB converter]] close enough to the [[Blue door]] during step 5 of the intended solution, then it is possible to grab it before the door closes at step 6. | |||
}} | |||
==== "Timed deconstruction" ==== | |||
{{Spoiler|2=alternative solution| | |||
[[File:Abyss - 10 - 7.1.jpg|left|thumb|State of the puzzle before removing the green [[RGB converter]].]] | |||
Forgetting to connect the green [[RGB converter]] to the fourth converter during step 7 of the intended solution causes the [[Blue door]] to open and close endlessly as the fourth converter emits green lasers that interfere with the setup. | |||
However, picking up the green converter while the door is open solves the interference, reaching the same state as step 8, albeit in a less elegant way. | |||
}} | |||
==== "Body blocking" ==== | |||
{{Spoiler|2=alternative solution| | |||
[[File:Abyss - 10 - 7.2.jpg|left|thumb|Grabbing the [[RGB converter]] before the door closes.]] | |||
After step 6 of the intended solution, instead of blocking interfering lasers by using the [[Receiver]]s on the side, it is possible to block one of them with the green [[RGB converter]], and the other one with [[Byron]]'s body. Doing this causes the door to open and close similarly to the [[#"Timed deconstruction"]] solution. When the door opens, run and pick up the converter before the door closes. | |||
}} | |||
== Miscellaneous == | |||
=== QR Code === | |||
[[File:Abyss 10 - QR Code.jpg|thumb|The QR Code, written by [[The Sphinx]].]] | |||
Outside the puzzle room, on the right-hand side, a QR Code written by [[The Sphinx]] can be found.<blockquote>Is a choice a choice if the outcome is unknowable? | |||
-- [[The Sphinx]]</blockquote> | |||
[[Category:TTP2 Into the Abyss Puzzles]] | [[Category:TTP2 Into the Abyss Puzzles]] | ||
[[Category:TTP2 Into the Abyss]] | [[Category:TTP2 Into the Abyss]] | ||
[[Category:Puzzles]] | [[Category:Puzzles]] | ||
Latest revision as of 12:35, 27 December 2024
| Metathesis | |
|---|---|
| |
| Identifier: | Abyss-10 |
| Area: | Into the Abyss |
| Previous Puzzle: | Color Theory |
| Next Puzzle: | The Ring |
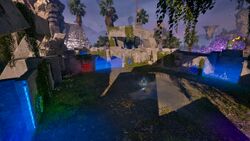
Metathesis is the tenth puzzle in Into the Abyss, part of the Road to Elysium expansion for The Talos Principle 2.
Puzzle Elements
Overview
The puzzle is a variation of Metaphora, where the Inverter in the second room has been replaced by a fourth RGB converter, and where two additional cells are located on each side of the first room.
Hints
If you have trouble getting started:
If you have trouble with intersecting lasers:
If the Blue door keeps closing just after it opens:
Solution
Alternative solutions
"Sleight of Hand"
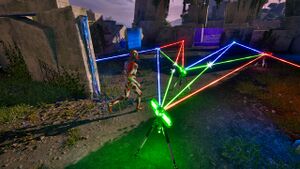
If you position the green RGB converter close enough to the Blue door during step 5 of the intended solution, then it is possible to grab it before the door closes at step 6.
"Timed deconstruction"
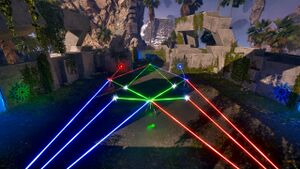
Forgetting to connect the green RGB converter to the fourth converter during step 7 of the intended solution causes the Blue door to open and close endlessly as the fourth converter emits green lasers that interfere with the setup.
However, picking up the green converter while the door is open solves the interference, reaching the same state as step 8, albeit in a less elegant way.
"Body blocking"
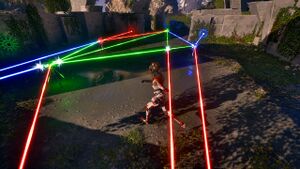
After step 6 of the intended solution, instead of blocking interfering lasers by using the Receivers on the side, it is possible to block one of them with the green RGB converter, and the other one with Byron's body. Doing this causes the door to open and close similarly to the #"Timed deconstruction" solution. When the door opens, run and pick up the converter before the door closes.
Miscellaneous
QR Code
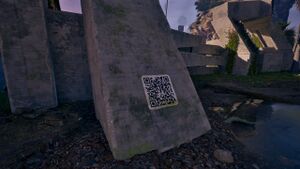
Outside the puzzle room, on the right-hand side, a QR Code written by The Sphinx can be found.
Is a choice a choice if the outcome is unknowable? -- The Sphinx


