Color Theory: Difference between revisions
Created page with "{{Infobox TTP2 Puzzle |identifier=Abyss-9 |image = Abyss-9.jpg|area=Into the Abyss |previous=Metaphora |next=Metathesis }} '''Color Theory''' is the ninth puzzle in Into the Abyss, part of the Road to Elysium expansion for The Talos Principle 2. == Puzzle Elements == {{Puzzle Element List}} == Overview == == Hints == == Solution == Category:TTP2 Into the Abyss Puzzles Category:TTP2 Into the Abyss Category:Puzzles" |
Tearphones (talk | contribs) m Using the cite extension |
||
| (6 intermediate revisions by 2 users not shown) | |||
| Line 5: | Line 5: | ||
|next=[[Metathesis]] | |next=[[Metathesis]] | ||
}} | }} | ||
[[Color Theory]] is the ninth puzzle in [[Into the Abyss]], part of the [[Road to Elysium]] expansion for The Talos Principle 2. | |||
== Puzzle Elements == | == Puzzle Elements == | ||
{{Puzzle Element List}} | {{Puzzle Element List|Blue door=true|Connector=true|Inverter=true|Pressure plate=true|Receiver=true|RGB converter=true}} | ||
== Overview == | == Overview == | ||
This unique puzzle room presents itself as a series of smaller interconnected trials involving an [[Inverter]], a couple of [[Connector|Connectors]] and multiple [[RGB converter|RGB converters]]. | |||
== Hints == | == Hints == | ||
== Solution == | == Solution == | ||
{{Spoiler|2=solution| | |||
<gallery> | |||
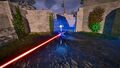
File:Abyss - 9 - 1.jpg|Use the [[Inverter]] to connect the blue [[Emitter]] to the red [[Receiver]]. | |||
File:Abyss - 9 - 2.jpg|Take one of the [[Connector|Connectors]], bring it into the corridor and connect it to the red [[Emitter]] in the second room. | |||
File:Abyss - 9 - 3.jpg|Take the other [[Connector]], bring it into the first room, and link the first Connector to the red [[Receiver]]. | |||
File:Abyss - 9 - 4.jpg|Take the [[Inverter]] and connect it to the blue [[Receiver]] in the second room. | |||
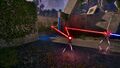
File:Abyss - 9 - 5.jpg|Take the [[Connector]] from the corridor to the second, and link the red [[Emitter]] to the [[Inverter]] and both red [[Receiver|Receivers]]. | |||
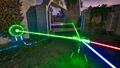
File:Abyss - 9 - 6.jpg|Proceed to the third room, and use the [[RGB converter]] to connect both [[Emitter|Emitters]] in the room to the green [[Receiver]]. | |||
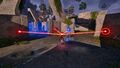
File:Abyss - 9 - 7.jpg|Take the [[Inverter]], bring it into the fourth room and link the red [[Emitter]] to the blue [[Receiver]] on the other side of the [[Blue door]]. | |||
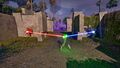
File:Abyss - 9 - 8.jpg|Take the second [[RGB converter]], and connect it to the red [[Emitter]], the blue [[Inverter]], and both green [[Receiver|Receivers]]. | |||
File:Abyss - 9 - 9.jpg|Bring the first [[RGB converter]] into the final room, and connect it to both [[Emitter|Emitters]]. | |||
File:Abyss - 9 - 10.jpg|Bring the second [[RGB converter]] into the final room and connect the red [[Emitter]] and green [[RGB converter]] to both blue [[Receiver|Receivers]]. | |||
File:Abyss - 9 - 11.jpg|Take the third [[RGB converter]] from the cell and connect the blue [[Emitter]] and green [[RGB converter]] to the red [[Receiver]] to finish the puzzle. | |||
</gallery> | |||
}} | |||
=== Dream solution === | |||
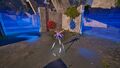
[[File:Abyss Audio Log 13.jpg|thumb|The green hologram of [[Alexandra Drennan]] enclosed after the end of the puzzle.]] | |||
After reaching the [[Progress Wheel]], the player is presented with an additional challenge: an extra room contains a green hologram of [[Alexandra Drennan]]. Opening it requires placing two tools on a pair of [[Pressure plate]]s. Retrieving the hologram plays the [[Abyss_audio_logs#Dream_2|Dream 2 audio log]]. | |||
The following solution was found on Intangir Voluntaryist's YouTube <ref>https://youtu.be/fUxJJj-y2YE?si=7jBXjTk0zxxWVhPF</ref> | |||
{{Spoiler|2=solution| | |||
* From the final room with the three RGB converters, hook up the first one to the two emitters, and place it in the center of the room. Take a second one and connect it to the first one, plus the blue emitter, turning it red. Take the third one, connect it to the first two, and aim its blue light at the blue receiver back in the previous hallway to gain access back to the previous room containing the inverter. | |||
* Take the inverter out into the hallway, and from the hallway-side of the blue door, connect it between the red emitter and the blue receiver in order to hold the door open and free the third RGB converter. You can now move all three RGB converters into the room that previously contained the inverter. Since we are now working backwards from the end, we'll now call this "room two". | |||
* From "room two", take one of your RGB converters and connect it to the red emitter and the blue inverter out in the hallway. Point its green light at both the green receiver immediately available in "room two", as well as at the green receiver beyond the blue door, over in the next room over - "room three". Setting the RGB converter down will open first one, then the other, granting you access back to "room four", which contains the connector still pointed at the other side of the double-door which separates rooms three and four. | |||
* Take the second RGB converter with you all the way into room four. Connect it back to the first one, shining green in room two, and the blue emitter you can see to the right of it, in room three. Point its red light at the red receiver to hold open the double-door instead of relying on the connector. | |||
* Bring the connector out into room three and connect it to the same two points - directing room three's blue emitter back towards room two's green RGB converter. Now that this converter has a new source of blue, it can hold the door open from inside without the inverter needing to connect across the span of the hallway to the blue receiver. Adjust the inverter to disconnect it from that receiver, but leave it connected to the red emitter inside room two, and set it down just outside the door again, in the hallway. | |||
* Grab the third RGB converter and place it behind the inverter, connected to it as a blue source, plus the red emitter, and aim it at the green receiver juuuust visible inside the door to the left. Make sure it is able to hold the door open from the outside, with both tools on the hallway-side of the door. You may now retrieve the blue connector from room three, which will close some doors. | |||
* Bring the connector out into the hallway with the inverter and the RGB converter that are holding the door open. Also collect the spare RGB converter from room two, as it is no longer needed there. You should now have one inverter, one connector, and two RGB converters all on the same side of the door, which you can now safely close. | |||
* Use the inverter and the connector to re-open the final door to the progress wheel, and carry your two unused RGB converters over to the pressure plates to retrieve the Dream. | |||
}} | |||
==References== | |||
<references /> | |||
[[Category:TTP2 Into the Abyss Puzzles]] | [[Category:TTP2 Into the Abyss Puzzles]] | ||
[[Category:TTP2 Into the Abyss]] | [[Category:TTP2 Into the Abyss]] | ||
[[Category:Puzzles]] | [[Category:Puzzles]] | ||
Latest revision as of 10:51, 16 July 2025
| Color Theory | |
|---|---|

| |
| Identifier: | Abyss-9 |
| Area: | Into the Abyss |
| Previous Puzzle: | Metaphora |
| Next Puzzle: | Metathesis |
Color Theory is the ninth puzzle in Into the Abyss, part of the Road to Elysium expansion for The Talos Principle 2.
Puzzle Elements
Overview
This unique puzzle room presents itself as a series of smaller interconnected trials involving an Inverter, a couple of Connectors and multiple RGB converters.
Hints
Solution
[ solution ]
-

-
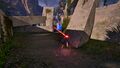 Take one of the Connectors, bring it into the corridor and connect it to the red Emitter in the second room.
 -
-
-
-
 Proceed to the third room, and use the RGB converter to connect both Emitters in the room to the green Receiver.
 -
-
 Take the second RGB converter, and connect it to the red Emitter, the blue Inverter, and both green Receivers.
 -
 Bring the first RGB converter into the final room, and connect it to both Emitters.
 -
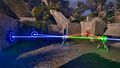 Bring the second RGB converter into the final room and connect the red Emitter and green RGB converter to both blue Receivers.
 -
 Take the third RGB converter from the cell and connect the blue Emitter and green RGB converter to the red Receiver to finish the puzzle.


Dream solution

After reaching the Progress Wheel, the player is presented with an additional challenge: an extra room contains a green hologram of Alexandra Drennan. Opening it requires placing two tools on a pair of Pressure plates. Retrieving the hologram plays the Dream 2 audio log.
The following solution was found on Intangir Voluntaryist's YouTube [1]
[ solution ]
- From the final room with the three RGB converters, hook up the first one to the two emitters, and place it in the center of the room. Take a second one and connect it to the first one, plus the blue emitter, turning it red. Take the third one, connect it to the first two, and aim its blue light at the blue receiver back in the previous hallway to gain access back to the previous room containing the inverter.
- Take the inverter out into the hallway, and from the hallway-side of the blue door, connect it between the red emitter and the blue receiver in order to hold the door open and free the third RGB converter. You can now move all three RGB converters into the room that previously contained the inverter. Since we are now working backwards from the end, we'll now call this "room two".
- From "room two", take one of your RGB converters and connect it to the red emitter and the blue inverter out in the hallway. Point its green light at both the green receiver immediately available in "room two", as well as at the green receiver beyond the blue door, over in the next room over - "room three". Setting the RGB converter down will open first one, then the other, granting you access back to "room four", which contains the connector still pointed at the other side of the double-door which separates rooms three and four.
- Take the second RGB converter with you all the way into room four. Connect it back to the first one, shining green in room two, and the blue emitter you can see to the right of it, in room three. Point its red light at the red receiver to hold open the double-door instead of relying on the connector.
- Bring the connector out into room three and connect it to the same two points - directing room three's blue emitter back towards room two's green RGB converter. Now that this converter has a new source of blue, it can hold the door open from inside without the inverter needing to connect across the span of the hallway to the blue receiver. Adjust the inverter to disconnect it from that receiver, but leave it connected to the red emitter inside room two, and set it down just outside the door again, in the hallway.
- Grab the third RGB converter and place it behind the inverter, connected to it as a blue source, plus the red emitter, and aim it at the green receiver juuuust visible inside the door to the left. Make sure it is able to hold the door open from the outside, with both tools on the hallway-side of the door. You may now retrieve the blue connector from room three, which will close some doors.
- Bring the connector out into the hallway with the inverter and the RGB converter that are holding the door open. Also collect the spare RGB converter from room two, as it is no longer needed there. You should now have one inverter, one connector, and two RGB converters all on the same side of the door, which you can now safely close.
- Use the inverter and the connector to re-open the final door to the progress wheel, and carry your two unused RGB converters over to the pressure plates to retrieve the Dream.