The Trident Enigma: Difference between revisions
Appearance
Created page with "{{Infobox TTP2 Puzzle |identifier=Blue-6 |area=Isle of the Blessed |puzzletype=Main |previous=The Intruder |next=The Twist and the Turn }} '''The Trident Enigma''' is the sixth puzzle in the blue section of the Isle of the Blessed. == Puzzle Elements == {{Puzzle Element List}} == Overview == == Hints == == Solution == Category:TTP2 Isle of the Blessed Puzzles Category:TTP2 Isle of the Blessed C..." |
RichouHunter (talk | contribs) →Solution: Added solution |
||
| Line 5: | Line 5: | ||
|previous=[[The Intruder]] | |previous=[[The Intruder]] | ||
|next=[[The Twist and the Turn]] | |next=[[The Twist and the Turn]] | ||
}} | |image=The Trident Enigma.jpg}} | ||
'''The Trident Enigma''' is the sixth puzzle in the blue section of the [[Isle of the Blessed]]. | '''The Trident Enigma''' is the sixth puzzle in the blue section of the [[Isle of the Blessed]]. | ||
== Puzzle Elements == | == Puzzle Elements == | ||
{{Puzzle Element List}} | {{Puzzle Element List|Activator=true|Blue door=true|Connector=true|Hexahedron=true|Inverter=true|Jammer=true|Pressure plate=true|Receiver=true}} | ||
== Overview == | == Overview == | ||
| Line 16: | Line 16: | ||
== Solution == | == Solution == | ||
{{Spoiler|2=solution| | |||
<gallery mode="slideshow"> | |||
File:Blessed Blue - 6 - 1.jpg|Take the [[Activator]] and place it down between the left and middle [[Blue door|Blue doors]]. | |||
File:Blessed Blue - 6 - 2.jpg|Take the [[Hexahedron]] and place it down on the [[Pressure plate]]. | |||
File:Blessed Blue - 6 - 3.jpg|Take the [[Activator]] and place it down in the central area, between the middle and right [[Blue door|Blue doors]]. | |||
File:Blessed Blue - 6 - 4.jpg|Connect the [[Inverter]] to the red [[Emitter]] and blue [[Receiver]]. | |||
File:Blessed Blue - 6 - 5.jpg|Take the [[Hexahedron]] and climb on the ledge to reach the [[Connector]]. | |||
File:Blessed Blue - 6 - 6.jpg|Bring the [[Connector]] into the starting room and link the red [[Emitter]] to the red [[Receiver]]. | |||
File:Blessed Blue - 6 - 7.jpg|Place the [[Hexahedron]] back onto the [[Pressure plate]]. | |||
File:Blessed Blue - 6 - 8.jpg|Bring the [[Inverter]] into the starting room. | |||
File:Blessed Blue - 6 - 9.jpg|Place the [[Activator]] back between the middle and left [[Blue door|Blue doors]]. | |||
File:Blessed Blue - 6 - 10.jpg|Use the [[Inverter]] to link the red [[Connector]] to the blue [[Receiver]]. | |||
File:Blessed Blue - 6 - 11.jpg|Take the [[Hexahedron]] and climb onto the ledge to reach the [[Jammer]]. | |||
File:Blessed Blue - 6 - 12.jpg|Bring the [[Jammer]] into the main area, place it down on the [[Pressure plate]] while disabling the central [[Blue door]]. | |||
File:Blessed Blue - 6 - 13.jpg|Bring the [[Hexahedron]] back into the main area and place it down against the ledge. | |||
File:Blessed Blue - 6 - 14.jpg|Take the [[Inverter]], bring it onto the ledge and connect it to the blue [[Receiver]] by the [[Progress Wheel]]. | |||
File:Blessed Blue - 6 - 15.jpg|Use the [[Connector]] and link the red [[Emitter]] to the [[Inverter]] as well as the red [[Receiver]] by the [[Progress Wheel]]. | |||
File:Blessed Blue - 6 - 16.jpg|Bring the [[Activator]] onto the ledge, connect it to the red [[Connector]] and place it down in range of the [[Blue door]] to finish the puzzle. | |||
</gallery> | |||
}} | |||
[[Category:TTP2 Isle of the Blessed Puzzles]] | [[Category:TTP2 Isle of the Blessed Puzzles]] | ||
[[Category:TTP2 Isle of the Blessed]] | [[Category:TTP2 Isle of the Blessed]] | ||
[[Category:Puzzles]] | [[Category:Puzzles]] | ||
Latest revision as of 13:19, 20 December 2024
| The Trident Enigma | |
|---|---|

| |
| Identifier: | Blue-6 |
| Area: | Isle of the Blessed |
| Puzzle Type: | Main |
| Previous Puzzle: | The Intruder |
| Next Puzzle: | The Twist and the Turn |
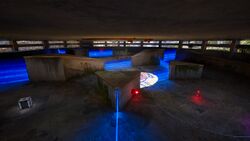
The Trident Enigma is the sixth puzzle in the blue section of the Isle of the Blessed.
Puzzle Elements
Overview
Hints
Solution
[ solution ]


