Grasslands Ring: Difference between revisions
m Added easter egg location |
|||
| (17 intermediate revisions by 5 users not shown) | |||
| Line 5: | Line 5: | ||
|next = [[Wooded Plateau]] | |next = [[Wooded Plateau]] | ||
}} | }} | ||
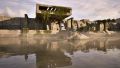
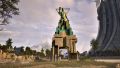
[[File: | The '''Grasslands Ring''', also commonly called '''East 1''', is a regular puzzle area, and the first one that the player visits. It is described as an artificial ring-like structure on the wide lowlands east of our base camp. | ||
[[File:Grasslands Ring Map (East 1).png|thumb|Detailed map of the area]] | |||
[[File:Grasslands Ring - Aerial view.jpg|thumb|Aerial view]] | [[File:Grasslands Ring - Aerial view.jpg|thumb|Aerial view]] | ||
As hinted by the test unit in the [[ | As hinted by the test unit in the [[Base Camp#Lost Lab|lost lab found at the Base Camp]], this area introduces the player to a new tool: the [[RGB converter]]. | ||
Solving | Solving five main puzzles in this area unlocks access to [[Wooded Plateau]]. | ||
== Puzzles == | == Puzzles == | ||
| Line 34: | Line 34: | ||
* [[Jump Start]] | * [[Jump Start]] | ||
== Tetromino | == Tetromino bridge == | ||
=== Section 1 === | === Section 1 === | ||
{{Spoiler| | {{Spoiler|[[File:East 1 - Tetromino Bridge 1.jpg|none|thumb]] | ||
[[File:East 1 - Tetromino Bridge 1.jpg|none|thumb]] | |||
|solution}} | |solution}} | ||
=== Section 2 === | === Section 2 === | ||
{{Spoiler| | {{Spoiler|[[File:East 1 - Tetromino Bridge 2.jpg|none|thumb]] | ||
[[File:East 1 - Tetromino Bridge 2.jpg|none|thumb]] | |||
|solution}} | |solution}} | ||
=== Section 3 === | === Section 3 === | ||
{{Spoiler| | {{Spoiler|[[File:East 1 - Tetromino Bridge 3.jpg|none|thumb]] | ||
[[File:East 1 - Tetromino Bridge 3.jpg|none|thumb]] | |||
|solution}} | |solution}} | ||
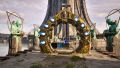
== Star | == Star monuments == | ||
=== Prometheus Monument === | === [[Star (TTP2)#Prometheus’ quotes|Prometheus Monument]] === | ||
[[File:East 1 - Prometheus Monument.jpg|none|thumb|Location of the Prometheus Monument]] | [[File:East 1 - Prometheus Monument.jpg|none|thumb|Location of the Prometheus Monument]] | ||
{{Spoiler| | |||
<gallery mode="slideshow"> | |||
File:East 1 - Prometheus sprite location 1.jpg|Initial location: southeast corner of the marsh | |||
File:East 1 - Prometheus sprite location 2.jpg|First stop: small tunnel in the south shore of the marsh | |||
File:East 1 - Prometheus sprite location 3.jpg|Second stop: in front of the bridge ring | |||
File:East 1 - Prometheus sprite location 4.jpg|Third stop: after the first section of the tetromino bridge (notice that you will need to have solved at least three puzzles to reach here) | |||
File:East 1 - Prometheus sprite location 5.jpg|Final stop: next to the Prometheus Monument | |||
</gallery> | |||
|sprite route}} | |||
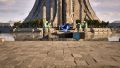
=== [[Star (TTP2)#Pandora’s quotes|Pandora Monument]] === | |||
[[File:Pandora Monument (East 1).jpg|none|thumb|Location of the Pandora Monument]] | [[File:Pandora Monument (East 1).jpg|none|thumb|Location of the Pandora Monument]] | ||
| Line 80: | Line 79: | ||
[[File:East 1 - Lost lab.jpg|none|thumb|Lost lab - Entrance]] | [[File:East 1 - Lost lab.jpg|none|thumb|Lost lab - Entrance]] | ||
[[File:East 1 - Lost lab - Driller.jpg|thumb|Lost lab - Driller test unit|none]] | [[File:East 1 - Lost lab - Driller.jpg|thumb|Lost lab - Driller test unit|none]] | ||
[[File:E1 LostLab Display.jpg|thumb|Lost lab - Display showing a map of the area|none]] | |||
== Documents and | == Documents and audio logs == | ||
=== VALA-1 === | === VALA-1 === | ||
| Line 92: | Line 92: | ||
=== VALA_EXT-1 === | === VALA_EXT-1 === | ||
This terminal can be found opposite the entrance to puzzle 5. | |||
* [[Trevor]] | * [[Trevor]] | ||
* [[Trevor's audio logs#Trev 001|Trevor_01]] | * [[Trevor's audio logs#Trev 001|Trevor_01]] | ||
| Line 99: | Line 99: | ||
=== VALA_EXT-2 === | === VALA_EXT-2 === | ||
This terminal can be found along the path between puzzles 3 and 4. | |||
* [[Founding_1]] | * [[Founding_1]] | ||
* [[Baby_Steps]] | * [[Baby_Steps]] | ||
| Line 107: | Line 108: | ||
* [[L1C_Lifthrasir]] | * [[L1C_Lifthrasir]] | ||
* [[Lifthrasir_01]] | * [[Lifthrasir's audio logs|Lifthrasir_01]] | ||
[[File:East 1 - VALA EXT-3.jpg|none|thumb|VALA_EXT-3]] | [[File:East 1 - VALA EXT-3.jpg|none|thumb|VALA_EXT-3]] | ||
=== [[Straton of Stageira]] === | === [[Straton's audio logs|Straton of Stageira]] === | ||
{{Spoiler|Straton is in the area surrounding the [[Castling]] building, near the opposite wall of the puzzle entrance. | {{Spoiler|[[File:Straton of Stageira - E1.jpg|Straton is in the area surrounding the [[Castling]] building, near the opposite wall of the puzzle entrance.|none|thumb]]|location}} | ||
== Ancient Human Artifacts == | == Ancient Human Artifacts == | ||
| Line 131: | Line 132: | ||
|location}} | |location}} | ||
== Anomaly == | |||
{{Spoiler|2=object and location|[[File:E1 Anomaly.jpg|none|thumb|Bomb from The Talos Principle 1 - The anomaly is located behind the gold puzzle.]] | |||
}} | |||
[[Category:Areas]] | [[Category:Areas]] | ||
[[Category:TTP2 Areas]] | [[Category:TTP2 Areas]] | ||
[[Category:TTP2]] | [[Category:TTP2]] | ||
__FORCETOC__ | __FORCETOC__ | ||
Latest revision as of 18:04, 11 March 2024
| Grasslands Ring | |
|---|---|

| |
| Short name: | East-1 |
| Area Type: | Regular |
| Previous Story Area: | Megastructure |
| Next Story Area: | Wooded Plateau |
The Grasslands Ring, also commonly called East 1, is a regular puzzle area, and the first one that the player visits. It is described as an artificial ring-like structure on the wide lowlands east of our base camp.
.png)

As hinted by the test unit in the lost lab found at the Base Camp, this area introduces the player to a new tool: the RGB converter.
Solving five main puzzles in this area unlocks access to Wooded Plateau.
Puzzles
Main Puzzles
- RGB Shifting
- Reconnection
- Castling
- Alternative Option
- Through the Door
- Alternatives
- Self-Sufficiency
- Entanglement
Lost Puzzles
Gold Puzzle
Tetromino bridge
Section 1
[ solution ]

Section 2
[ solution ]

Section 3
[ solution ]

Star monuments

[ sprite route ]
-
 Initial location: southeast corner of the marsh
 -
 First stop: small tunnel in the south shore of the marsh
 -
 Second stop: in front of the bridge ring
 -
 Third stop: after the first section of the tetromino bridge (notice that you will need to have solved at least three puzzles to reach here)
 -
 Final stop: next to the Prometheus Monument
.jpg)
Solution
[ ]
_-_Solution.jpg)
Prometheus Sparks
[ location of the first spark ]

[ location of the second spark ]

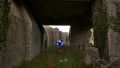
Lost Lab
The lost laboratory is located in the northern shore of the marsh that surrounds the tower. It features a driller test unit mounted on a table. It also contains the terminal VALA-1.


Documents and audio logs
VALA-1

VALA_EXT-1
This terminal can be found opposite the entrance to puzzle 5.

VALA_EXT-2
This terminal can be found along the path between puzzles 3 and 4.

VALA_EXT-3

[ location ]

Ancient Human Artifacts
[ location ]

[ location ]

[ location ]

Anomaly
[ object and location ]
